Manual Overview
This guide consists of several different parts and could be read from top to bottom.
However it is likely helpful to have an overview of all the parts in the guide and that is why this section exists.
This guide consists of several different parts and could be read from top to bottom.
However it is likely helpful to have an overview of all the parts in the guide and that is why this section exists.
To install this package the user need rather good knowledge in how to build and compile external packages under Linux. In this section the easiest way to install the software is explained.
It may be necessary that the host computer runs Ubuntu in order for some of the commands to work. The developers have only tested this procedure on Ubuntu 12.04 LTS, however the solution will probably work on most Debian based operating systems.
The Android application will be have to be installed to the capture device. The easiest way to do this is to visit the download page from your mobile device and there fetch the latest .apk file. The software is compatible with Android 4.0 and later.
Before reconstruction of the video can start on the computer the camera of the device have to be calibrated. This is explained in the section Calibrating Camera.
Fetch the software from the download page and extract the archive to a folder of your choice. To compile the software open a terminal and navigate to the directory with the newly extracted files. From this prompt use the make command to build the project. Parallelise the build process you may want to use the optional j-flag.
To build this project a number of external libraries have to be built and downloaded. On the project computer these libraries are already built, but if the software is to be run on another platform you will want to install these separately. To speed up this process we provide a script that installs all necessary dependencies for ubuntu systems. For more advanced situations please consult the documentation and compile all external libraries listed. A typical install under Ubuntu 12.04 would look like this:
mkdir MO3R
cd MO3R
wget www.isy.liu.se/edu/projekt/bildbehandling/2012/tsbb11_grupp1/files/Dependencies%20Install.fix
wget www.isy.liu.se/edu/projekt/bildbehandling/2012/tsbb11_grupp1/files/PC%20Software.zip
sudo +x Dependencies Install.fix
./Dependencies Install.script
unzip PC Software.zip
make -j10
When row six is run there will be a lot of questions in the terminal. Choose yes to install all packages required for MO3R. Among other things this script takes care of installing OpenCV 2.4.2 and SparseLM that otherwise could be quite cumbersome to install manually.
To accurately reconstruct 3D the cameras perception of the world has to be normalised and undistorted. This is performed using a special process that is explained in this section.
There is one external tool needed to calibrate the camera in a good way. That is a checkerboard pattern that the software can identify. Under downloads a file named "Checkerboard Pattern" will be listed. Print this file before continuing any further
When starting the mobile application provided there is an option of capturing a "Single Image". Use this function to capture images of the checkerboard printed in the previous step. Make sure the checkerboard is flat and that the camera captures all squares from as varying angles as possible.
Transfer the files to the computer and place them in a location of your choice. Identify the Parameters.ini file inside of the PC software folder. The location of this file should be ROOT_OF_PROJECT/CONF/Parameters.ini. Open this file and find the row that says "CAMERACALIBRATION_DIR" and enter the path to the captured images here. Also check and make sure that "CAMERACALIBRATION_USEFILE" is set to false before continuing.
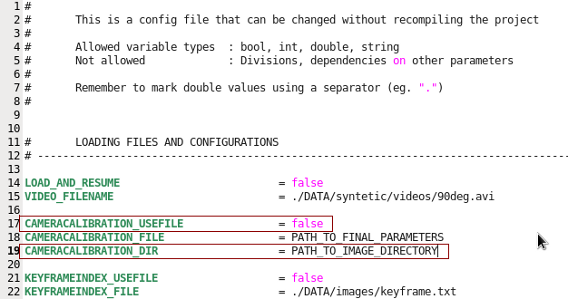 Check and make sure the two marked lines are correct.
Now start the main application by typing "./main" from the project root directory and follow these steps:
The rest of the reconstruction will automatically start. To use the calculated calibration at a later time fetch the file "calibration.txt" from the project root and place it somewhere suitable, for example in ROOT_OF_PROJECT/CONF/.
The last part is really simple. Open up the file Parameters.ini and change the line "CAMERACALIBRATION_USEFILE" to true and the "CAMERACALIBRATION_FILE" to point to your newly calculated "calibration.txt". For the case when reconstruction is run immediately after calibration the correct configuration is automatically chosen.
In some cases the estimation of the distortion coefficients tend to not work, in these situations it appears to be better to not use them at all. If the video is clearly more distorted after calibration compensation than before try replacing the values of the distortion vector in "calibration.txt" with zeros.
This section deal with how to obtain a video. Everything on how to operate the mobile application is dealt with under this section.
Apart from camera calibration and network transfer these are the things you will know about the mobile application.
When the software is installed you are ready to capture video. There are three crucial things to keep in mind while operating the capture device.
When starting up the application on the mobile device the user is faced with a view similar to this one:
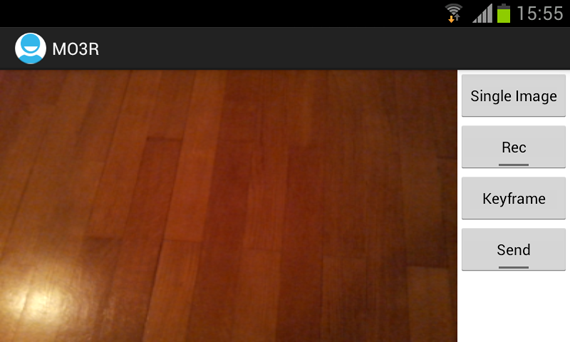
Standard view of the mobile application
From this menu click the Rec button to start recording and click the same button again to stop recording. The button for Keyframe is used as a way for the user to indicate the time at which the initiation should finish and continuous reconstruction and tracking should commence.
The Send button starts sending data to receiving computer. It will send all captured video in the order it was captured, it is therefore possible to capture more than one sequence before reconstruction. It is also possible to send video while capturing as the processes operate in separate threads. Before this button is pressed however it is important that the receiver is ready and awaiting a connection. Otherwise the application may have to be restarted in order to get at connection to the computer.
To initiate the camera it is important to move the camera very smoothly and only in a panning motion. Rotation of the camera during this face may result in irrecoverable errors which makes the video impossible to use. The easiest way to describe this motion is with an image:
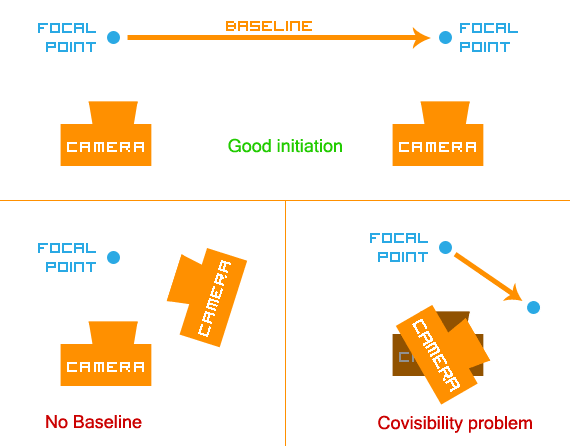 Overview of how the initiation of the camera should be performed
This translation should be somewhere around 10-20 cm depending on the depth of the scene. A deeper scene may require a longer translation for accurate triangulation.
When the initial panning is done the user should press the button marked keyframe before proceeding to capture more data. This allows the computer to automatically find where the initiation of the 3D map should occur. Otherwise this may be specified later.
When the map has been initialised the motion of the mobile device is actively tracked in relation to what it sees and what has been reconstructed. This allows for free movement around and along any axis as long as the motion is slow enough for the system to be able to accurately identify new points of interest (no major motion blur or distortion) and by that reconstruct enough points that can be used for effectively computing the ego motion of the camera. Essentially the two first general capture guidelines is what should be kept in mind.
All videos have to somehow get to the computer before reconstruction. This part explains how to use the wireless part of our Android application to transfer video files and other data to the PC.
In order to connect the mobile device to the computer the IP adress of the computer has to be known. One of the easiest ways of finding this adress is by either googling myip or by typing the following in a terminal window:
ifconfig
The IP adress is the number separated by four dots inside the red rectangle in the following image.
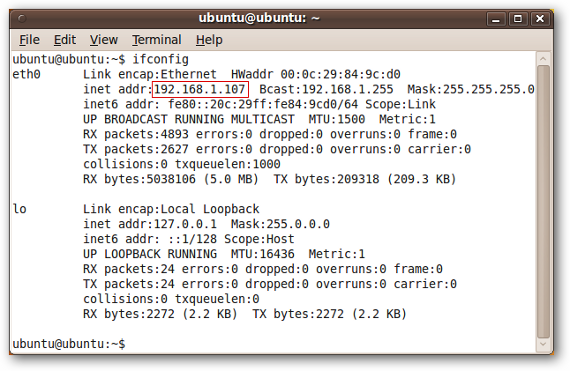
Output from ifconfig command
Fire up the mobile software and press the options button to show a small window asking for IP adress. Enter the adress exactly as it is shown on computer screen with the port number 8080 added to the end. This port is the default port used by the pc software. If problems connecting occur, please make sure the two devices uses the same network (eg. that the mobile device uses a wifi router that also connects to the PC using either wire of wifi).
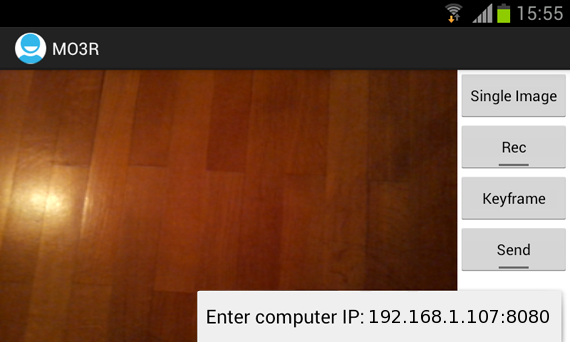
View of the mobile application with the correct IP inserted
Now it is almost time to start the PC software. However in order to get the software to receive it is necessary to empty the "images" folder within the project root. This folder is used for storing data that is received and if it isn't empty it will instead load the video file specified by the user in Parameters.ini.
When the images folder is empty the software may be started as usual by running main. This is one example of how to do this.
mv images images_bak
mkdir images
./main
The terminal will display the following message:
Listening for incoming connections on port 8080 ...
It is now time to press the send button on the mobile device. It would be possible to press this earlier, but it would only cause the mobile device trying to send without getting an acknowledgment from the PC software. The user may at any time while this text is displayed press a button on the PC to abort receiving data and instead start the reconstruction from the file specified in the configuration file.
When the connection is successful the terminal output will look something like this:
Receiving video...
Video received: 2969 kB
Receiving keyframe...
Keyframe received
Receiving misc data...
Misc data received
The order of received data is not necessarily the same as in this example and misc data is not always sent from the mobile device. The most important is that the video is received. When all data is received the system automatically starts reconstructing the scene in the same way as when running from a previously stored file.
This section deals with how to load a video file and run the main program. For the process of getting the video from the mobile device to the computer please see Network Transfer.
Open up "Parameters.ini" and enter the search path for your video file for the parameter called "VIDEO_FILENAME". Make the choice to either use the recorded keyframe index from the mobile device or set one manually for this run using parameter "KEYFRAMEINDEX_USEFILE". More about this setup is explained under Configuring Parameters.
Open a terminal and navigate to the project directory. Execute the reconstruction process by running main.
./main
The visualiser is operated using the mouse. By clicking and holding the left mouse key the user is able to look around freely. By pressing the scroll the user pans the camera in the view plane. On the keyboard there are a number of modifiers that helps navigation and analysation. Most notably there is a possibility of resetting the scene effectively refocusing the data within view. This is useful if the solution or user gets lost and is accessed by pressing "r". Navigation is also possible using W, A, S, D on the keyboard.
Among other options the user have the possibility of fixing the camera to the current keyframe simulating how the system thinks the camera moved. This is useful for comparing the reconstruction to the video of the world. This options is accessed by pressing "o" and is preferably used with keyframe images turned off (press "k"). These and all other options are listed under Keymappings.
As these reconstructions sometimes takes a long time there is a possibility of saving the progress. By pressing "y" a snapshot of the scene is saved to "theMap.map" in the project root. To resume from this point in the reconstruction set the parameter "LOAD_AND_RESUME" in Parameters.ini to true.
The rest of the reconstruction pipeline makes no checks to see that all parameters are the same or the video is the same as before. In order to avoid problems make sure to use the same video as when "theMap.map" was created. The other parameters may be adjusted freely but should probably be kept around what they where initially.
There are a lot of parameters for this kind of application and most of them are already adjusted to fit a general outdoor environment in the file you downloaded. However there are cases when the situation is different and some settings need to be tweaked. Because of this almost all variables in the whole setup is accessible from one file. Each and everyone of these parameters gets a short explanation in the table below. The ones most likely in need of tweeking are explained here.
It is mainly the first part of Parameters.ini that will have to be set for each run. The parameters in this part of the configuration file are rather straight forward and has almost nothing to do with the reconstruction in itself. Instead they affect which files to use and some preferences concerning these files.
The first parameter sets if the reconstruction pipeline should attempt to load a reconstruction from a file or start from the beginning. Using the load functionality assumes that the file called "theMap.map" is created using the same parameters in Parameters.ini as well as using the same video file. Otherwise the reconstruction might behave erratically.
The second parameter specifies which video file to load. This should be set to the video that the user want to reconstruct check this to make sure. If the parameter here is invalid the program will fail to initialise the reconstruction.
After this there is a group of parameters that concerns camera calibration. The first parameter ("CAMERACALIBRATION_USEFILE") should be set to false given that the particular capture device used has already been calibrated. For information on how to obtain the calibration file or other questions concerning these parameters please read the Calibrating Camera section.
In the second group of parameters there are three parameters roughly corresponding to the three used for calibration. These three deal with how to set the second keyframe for the initiation step. The first parameter ("KEYFRAMEINDEX_USEFILE") should be set to true if possible. By selecting this option the algorithm will utilise the keyframe the user specified while capturing the video just make sure the "KEYFRAMEINDEX_FILE" points to the file "keyframe.txt" that came with the video from the capture device. If this instead is set to false the last row in this group ("KEYFRAMEINDEX_MANUAL") will be used. The value provided here is the number of frames before adding the second keyframe. This may require some testing to get right.
 Overview of these parameters
Most often when this occurs, particularly when only the first two frames have been added it is a matter of poorly chosen baseline for the initial keyframes. The baseline is the translation described during Initiation under Capture Video. Is everything lost if this happens? Hopefully no.
Other errors may be an abundance of outliers, or bad points that does not seem to fit the real data or loss of tracking after a couple of frames.
First check the tracking output from the run before anything is drawn in the visualiser.
If the above bullets look ok, but there are too few or too many points are constructed one simple parameter to adjust is "ORB_MAX_DETECTION_INITIAL". Set this to a higher value and the detector will initiate more new points, set it lower to get fewer higher quality points.
If there are too many outliers present in the 3D point cloud, it is likely that some conditions for triangulation of points or outlier removal have been set too generously. Try changing the following parameters to reduce the number of bad points:
If the tracking is lost, as in the initiation, check if this might be because of glitches in the video. If large glitches occur when the capture device is traversing unexplored areas there is no way for the system to accurately identify itself and the tracking will fail. This is very hard to compensate for, but might be possible by increasing the number of triangulated points. Try adjusting any of these parameters to allow for more generous triangulation of new points:
It is important to understand that these parameters work in conjunction and that changing one variable dramatically may force another to be adjusted. These tips and hints are to be regarded as such and are therefore not a recipe for success. If none of these tips work it is possible to adjust any of the other parameters. Unfortunately the results are harder to predict and this is in general not recommended. Try first to recapture the video and see if that solves the problem.
Here the parameters that are most commonly adjusted listed and explained. Some further possibilities for tweaking exists in the configuration file.
The location of the configuration file is specified in the main c file of the project, the one with the main function. Usually however the location of the file is "./CONF/Parameters.ini"